Creating your Own Base Image for Docker
Have you ever wondered what it's like to create a docker base image that users can import and build on? This tutorial will show you how to make your own Docker base images from scratch in two different approaches.

Hello World! Until now, you and I have relied on the Docker team's base images (ubuntu, alpine, and so on), but have you considered how we may construct our own base image from the ground up, rather than relying on someone else's base image? No more wait! In this post, I will guide you with two ways to create your own images from scratch: via File System and Scratch image
Before moving forward, I would like to clear some confusion between parent image, base image, and scratch image. If you already know that, feel free to skip this. Every Dockerfile starts with the FROM directive which is used to tell the docker runtime which image to use as an underlying base image and perform operations on top of it.
A parent image is what tells the runtime to pull the image from the remote repository or use from the one already pulled. Most of the docker files start from this image instead of creating their own base image.
The base image is the one that has a special FROM scratch directive. It will send the signal to the build system to not pull any image but to create from the start. You can say, the base image is the parent image of the parent image.

Creating from the File System
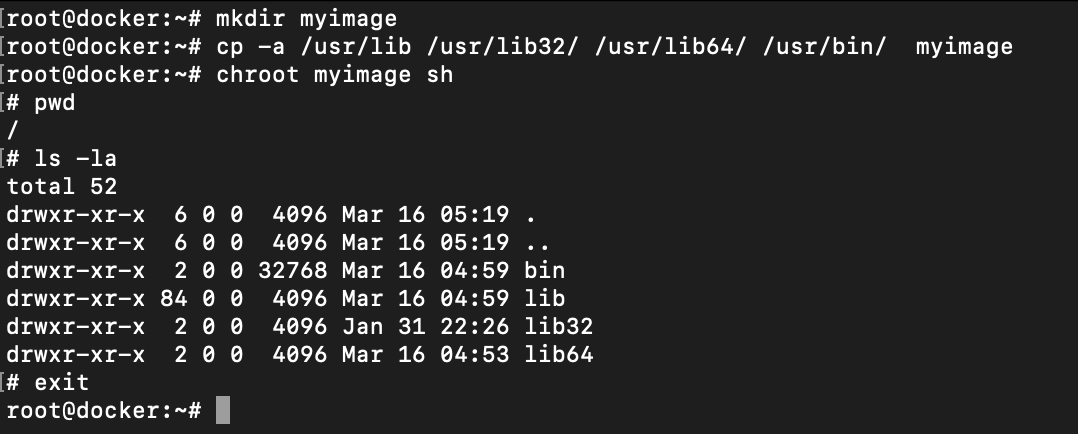
Docker image is nothing but information of files to be mounted via overlay filesystem that has all the available tools to run your application without installing any particular OS-level libraries like libc and other standard things. To have these files, I have copied the libraries and binaries from /usr directory to myimage directory as shown below
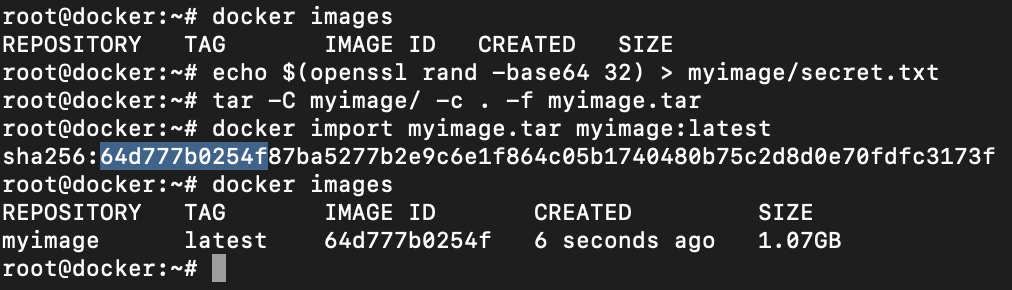
/usr directory to myimageNow create a secret.txt file with some random string. I am using openssl rand function here. After you have done this, create the tar archive of the image and save it into the tar file of any name.
Import the files using docker import command which requires the tar archive file and the image name. Once this is done, you will see the sha256 hash digest of the image imported and docker images output will show the entry of the same.
Now run the docker container of myimage:latest image we have just imported as shown below

myimage and reading contents of the secret fileThe default command executed by docker is defined in theENTRYPOINTinstruction. Since that was not defined while importing the image, you can provide it manually via--entrypoint </path/to/bin>in docker run
Let's use our image as the parent image. In the following Dockerfile, I am using the filesystem from myimage:latest image, creating a file with name mysecret.txt and appending another string to the secrets.txt. Lastly, the entrypoint is mentioned to spawn a shell so we don't have to provide it in the run command.
FROM myimage:latest

RUN touch mysecret.txt
RUN echo $(openssl rand -base64 32) >> /secret.txt

ENTRYPOINT ["/bin/sh"]/bin/shBuild the docker with different image name or tag or both. In this I am using the same image name myimage but using different tag v2. Let the runtime parse dockerfile and build the image.
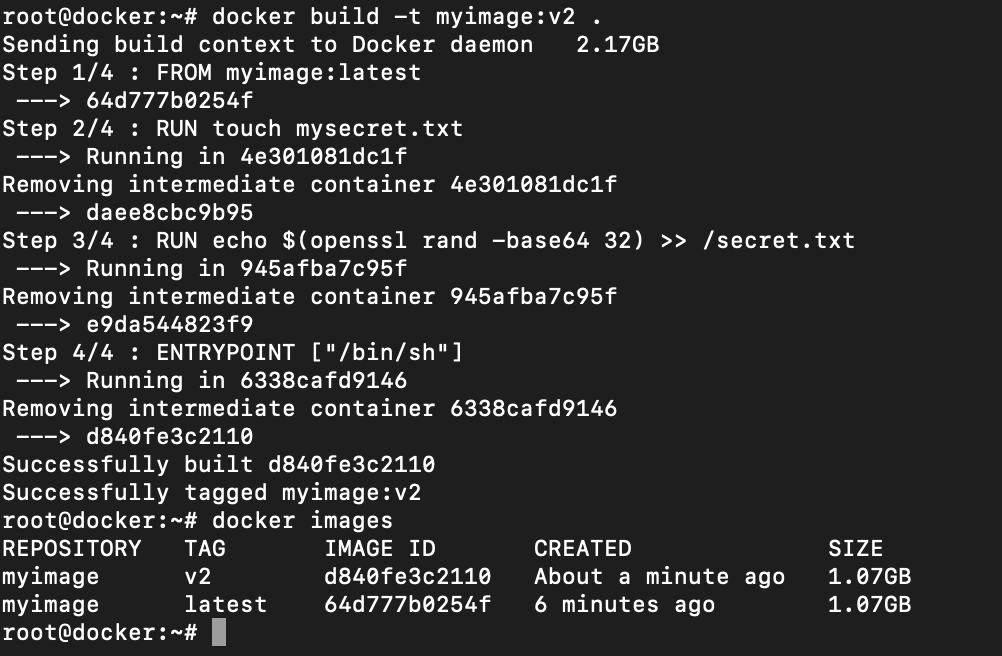
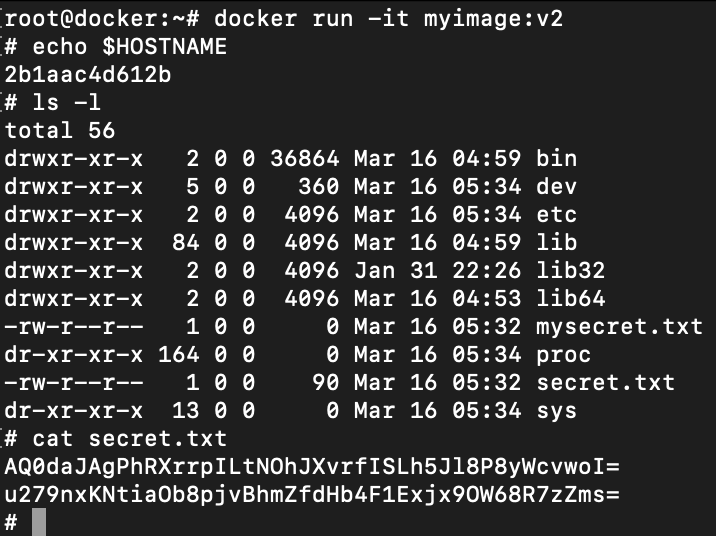
Run the docker image with tag v2. Now this time since the entrypoing is already defined, it is not required in the following command. However, docker still provides you an option to override it with the --entrypoint option.
Creating from Scratch
The docker team has already noticed the need that users might require to create their own images. Keeping that in mind, they have already created a special base image known as scratch and released on the Docker Hub
Despite being hosted on the public repository, you cannot pull it and save it to the local registry but provide it in the Dockerfile FROM instruction which will trigger a signal in the build process that next coming file as the first one.
// file main.c
#include <stdio.h>
#include <stdlib.h>

int main(int argc, char** argv) {
	if (argc < 2) {
    	fprintf(stderr, "usage: %s <name>\n", argv[0]);
    	return 0x1;
    }

	printf("Hello %s!\n", argv[1]);

    return 0x0;
}Compile the above code using GCC in the Linux system using the following command
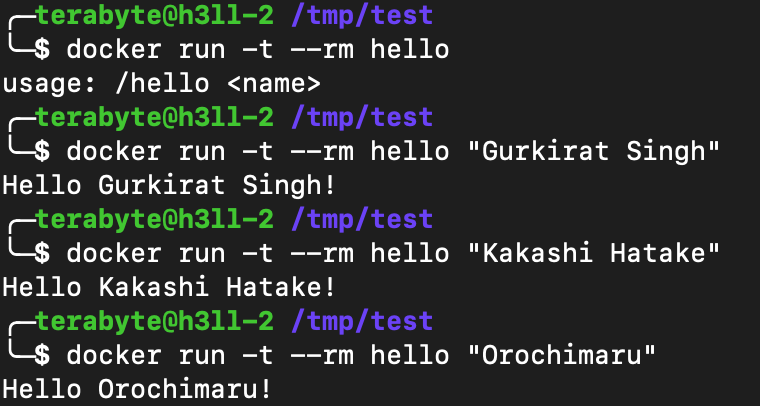
gcc -o hello main.c -staticSince the base image has no other libraries required by the binary, we have used -static flag in the GCC to tell the compiler that embed all the libraries in the binary (static linking)Now create a Dockerfile in the current directory with the following instructions
FROM scratch
ADD hello /
ENTRYPOINT ["/hello"]
You can see the build succeeded in a very short time and the size of the image is less than the size of the binary created by the GCC build. This is because of the compressed image size and also has some metadata with it.

When you will export the image using docker save and then check for the file systems, you will find only 1. Extract it, you will see that there is the same file that we have added from the local file system.

Now let's run the docker image and test whether our image is working as expected or not.